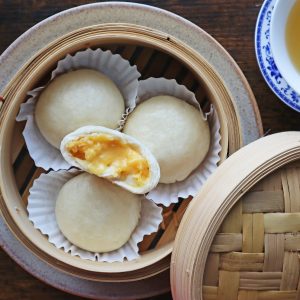
Recipe for Nai Wong Bao (Chinese Steamed Custard Buns)
These homemade Nai Wong Bao (Chinese Steamed Custard Buns) feature an ultra-soft, cloud-like dough wrapped around a luscious, golden custard centre. Combining whole milk, rich butter, custard powder, and savoury steamed salted egg yolks, this recipe creates a delightful semi-lava filling that strikes the perfect balance between classic firm custard buns and flowing Liu Sha Bao.Steamed in a traditional bamboo steamer, each bun puffs up into a tender, snowy-white dome with a velvety filling that gently melts the moment you tear it open. Whether enjoyed warm as part of a weekend dim sum spread, served for a cosy breakfast, or savoured as an afternoon treat alongside hot tea, these buns bring the authentic taste and warmth of Hong Kong tea houses straight into your home kitchen.Please refer to the video instructions at the end of the recipe if you’d like to see how to make Nai Wong Bao (Chinese Steamed Custard Buns) in action.
Equipment
- 1 small saucepan
- 1 bamboo steamer
- 1 a wok or wide pot
Ingredients
Custard Filling:
- 2 salted egg yolks
- 1 egg yolk
- 45 grams granulated sugar
- 20 grams custard powder
- 15 grams cornstarch
- 15 grams milk powder
- 100 grams whole milk
- 50 grams evaporated milk
- 30 grams unsalted butter
- ½ teaspoon vanilla extract
Bun Dough:
- 175 grams bao flour or cake flour
- 20 grams cornstarch
- 20 grams granulated sugar
- 6 grams neutral vegetable oil
- ½ teaspoon baking powder
- ½ teaspoon instant dry yeast
- 110 grams lukewarm whole milk or water
Instructions
- Cook and Sieve the Salted Egg Yolks:Place the salted duck egg yolks into a small steamer.Steam over medium heat for about 10 minutes until fully cooked and firm.Transfer the hot yolks into a fine-mesh sieve and press them through with a spoon or spatula until completely smooth. Set aside.
- Make the Custard Base:In a saucepan, whisk together the fresh egg yolk, granulated sugar, custard powder, cornstarch, and milk powder.Gradually pour in the whole milk and evaporated milk, whisking continuously until smooth and free of lumps.Whisk in the sieved salted egg yolks until thoroughly combined.
- Cook and Chill the Custard:Place the saucepan over low to medium-low heat.Cook, whisking constantly and scraping the bottom and corners of the pan, until the mixture thickens into a glossy, condensed-milk consistency.Remove the pan from the heat immediately. Stir in the unsalted butter until fully melted and incorporated, then stir in the vanilla extract.Pour the warm custard into a shallow container and press a sheet of plastic wrap directly onto the surface to prevent a skin from forming.Place the container in the freezer for about 2 hours, or until very firm and partially frozen (it should be solid enough to hold shape, but still scoopable).
- Portion the Custard Filling:Prepare a food scale and a small dish of milk powder.Scoop and weigh the chilled custard into 10 equal portions, approximately 21 to 22 grams each.Lightly dust your hands or roll each portion in milk powder to keep it from sticking, then gently roll it into a smooth ball.Place the portioned custard balls back into the freezer to keep them firm while you prepare the dough.
- Prepare and Rest the Dough:In a large mixing bowl, whisk together the bao flour, cornstarch, granulated sugar, instant dry yeast, and baking powder.Add the lukewarm milk (or water) and the vegetable oil. Stir with chopsticks or a spatula until a shaggy dough begins to form.Knead by hand for 10 to 15 minutes (or in a stand mixer on low speed for 8 to 10 minutes) until the dough becomes silky-smooth, soft, and elastic. If the dough feels stiff or cracks, knead in an extra splash of liquid a few drops at a time.Form the dough into a smooth ball, cover the bowl with its lid, and let it rest for 15 to 20 minutes to relax the gluten.
- Portion and Shape the Dough:Transfer the rested dough to a clean work surface. Weigh the total dough (about 319 grams) and divide it evenly into 10 pieces, roughly 32 grams each.Roll each piece into a small, neat ball. Place the dough balls back into the mixing bowl and cover with the lid to prevent them from drying out as you work.
- Assemble the Buns:Take one dough ball and flatten it with the palm of your hand. Using a small rolling pin, roll it into a round disc about 8 to 9 cm wide, keeping the centre slightly thicker than the outer edges.Retrieve the custard balls from the freezer. Place one firm custard ball directly in the centre of the wrapper.Gather the edges of the dough upward around the filling and pinch the top tightly together to seal completely.Flip the bun over so the pinched seam faces downward. Cup your hands around the bun and gently rotate it against the work surface to form a smooth, rounded dome.Set the shaped bun into a cute paper cupcake liner (or onto a small square of parchment paper). Repeat the process with the remaining dough and filling.
- Proof the Buns:Arrange the assembled buns inside your bamboo steamer tiers, leaving at least 3 to 4 cm of space between them to allow room for rising.Cover the steamer with the bamboo lid and let the buns proof for 25 to 35 minutes at room temperature.The buns are ready to steam when they look slightly puffed, feel pillowy and feather-light, and slowly spring back when gently pressed with a fingertip.
- Steam and Cool Gradually:Add water to a wok or wide pot and bring it to a steady, rolling boil over medium-high heat.Place the covered bamboo steamer over the boiling water and steam for 8 to 10 minutes.Once the time is up, turn off the heat immediately. Do not open the lid yet. Leave the steamer undisturbed with the lid fully closed for 2 minutes.Next, crack the lid open just a sliver and wait another 1 to 2 minutes before removing it completely. This gradual release of steam prevents thermal shock and keeps the skin perfectly smooth without wrinkles or deflating.Serve immediately while warm to enjoy that luscious, velvety semi-lava custard centre!